
mapsetup [-b int] [-L] [-p] -l locations
You should use the options -c and/or -m if you can. If not, use the option -l.
Unless a margin is specified with the option -b, a margin of 100 PostScript points is used (72 points is 1 inch) if info for clipping and/or map are present (options -c and/or -m), otherwise, a margin of 150 is used. In the latter case, the extra space is needed because painting will extend outward from each location.
The image is centred on a page of size A4, unless you use the option -p, in which case the papersize will be letter.
The data used for creating the clipping file is just a list of coordinate pairs, X and Y, stored in a file. The file can be divided in sections. Each section defines a polygon: straight lines are used to link one coordinate to the next.
You may get the data you need from a GIS database. Don't go for the very fine-grained polygons. If there are too many points used to define the clipping path, you may exceed the capacity of the PostScript device (or PDF device, after conversion).
For clipping purposes, each section should describe a single, closed area. Don't forget to repeat the first coordinate pair at the end of the section. You can have multiple sections to describe multiple areas, such as a country with an island off the cost of the main land.
It is also possible to cut out a region from another region, such as a large lake within a country.
The order of coordinates is important. You should always run areas that are supposed to be painted in one direction (clockwise), and regions that need to be cut out in the opposite direction (anti-clockwise).
One section (country, island, lake) consists of consecutive lines with coordinate pairs. A section ends when there is a line without coordinate pairs. If you want the input file to be used by the R program (with the polygon function), you should separate one section from the next with a line that has: NA NA
In this input file only, end of line comments are allowed. These comments will be copied to the output file, and can be helpful if you want to edit the result.
Here is an example, followed by the input file that can be used to create the clipping file:
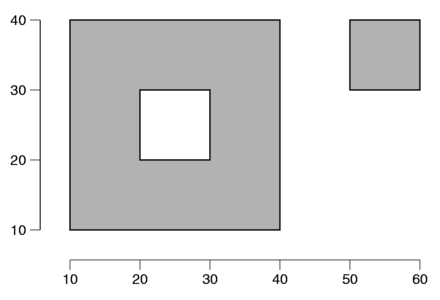
    10 10   # begin big square, bottom left corner
    10 40   # line up (clockwise)
    40 40   # line right
    40 10   # line down
    10 10   # line left
    NA NA   # end big square
    50 30   # begin small square, bottom left corner
    50 40   # line up (clockwise)
    60 40   # line right
    60 30   # line down
    50 30   # line left
    NA NA   # end small square
    20 20   # begin hole in big square, bottom left
    30 20   # line right (anti-clockwise)
    30 30   # line up
    20 30   # line left
    20 20   # line down
	    # end hole in big square
The input file used to create the map file is just like the input file used to create the clipping file. In this case, you don't have to worry about clockwise or anti-clockwise running polygons. Polygons don't have to be closed either. You can add lines for other things such as internal (state) borders, canals, whatever you like.
But you can use just the same data file to create both clipping file and map file. The result will be a map with lines running along all the borders, and no other lines.
The rest is for PostScript programmers only:
The map file draws all lines first as a continuous white line with linewidth 1.5, and then again in black with linewidth 0.5. You may want to edit the file to change this, to change line styles and colours, differentiating between different pieces.
You may want to add text. This simple example will print the text Island just below the little square in the map example above. The function Map translates map coordinates to image coordinates:
    50 30 Map moveto
    0 -12 rmoveto
    (Island) show