
5. On making maps
The easiest way to make a new map is by using Google Earth. Draw a map
in Google Earth, add places, and have it converted to R
uG/L
04:
The hard way is to construct your own maps using collected data. This gets
discussed below.
Before you can draw a map, you need to gather some data. First of all, you need a
list of coordinates of the locations from which you collected the dialect
data. Secondly, it is desirable, but not required, to know the borders of
the area. Thirdly, you can use other things, such as internal borders, rivers,
any lines that can help to orientate the viewer. Below are two examples.
On the left a map that uses all three kinds of information, on the right
a map that uses only coordinates of the dialect locations.
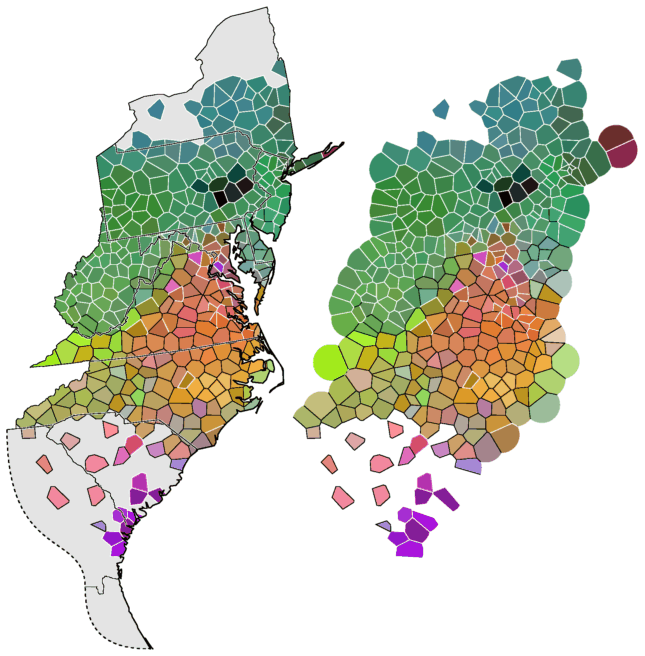
Maps with outer border and internal borders (left) and without borders
(right)
The gray area has locations, but without data
5.1 Obtaining geographic data
With a little luck, you can find coordinates for all locations on the web. Try
one of these three:
(If one of these links has changed, please report this to
me.)
Obtaining the border of an area is more difficult. What you need is a polygon
(or a group of polygons if it isn't a single connected area), a closed
sequences of coordinate pairs that divide the border into short,
straight line segments. You probably need to ask the assistance of
someone with access to a Geographic Information System (GIS).
There are a few things you should pay attention to:
The polygon (or polygons) should be saved with coordinates of longitude and
latitude. It is common for a GIS to translate the coordinates to some
coordinate system that is optimal for the area at hand, to display the
area on the two-dimensional plane. However,
RuG/L04 software has its own program to obtain this
optimal coordinate mapping. Suppose you have a map and some locations,
and at a later point you want to add more locations (for instance,
because you got more dialect data). If all coordinates are in longitude
and latitude, then all you have to do is find the coordinates of the
new locations, and you don't need to use the GIS.
If the GIS allows, choose to have not too much detail. If a polygon of a 1000
point gives a map that looks satisfactory, then don't use a polygon of
8000 points, unless you want the map to look as good as possible. A
polygon with too many points may result, under some circumstances, in
images made with RuG/L04 that can not be displayed.
The required file format for the polygon, or set of polygons, is described in
the manual of the mapsetup
program (this program is discussed below).
5.2 Geographic projection
If you have coordinates in longitude and latitude, then there are two ways to use them.
If the area is of moderate size, and not located too close to a polar area, you
can use the coordinates as they are. All you have to do then is
adjusting the relative scale between the two coordinate axes. This is done
for the map of Pennsylvania in
part 2 and
part 3 of the tutorial.
For larger areas, you need to translate the coordinates from longitude and
latitude (sphere coordinates) into a suitable geographic projection on
the two-dimensional plane. You can use the
ll2grid program to do this. Refer to the
manual of this program to see how exactly
this is done.
There is one thing you should pay attention to. Take the map of Pennsylvania
for example. The map shows some long, straight lines, borders that run
along a particular longitude or latitude. When you project this map
using ll2grid, those lines should be curved,
but these long lines are indicated by end points only, and the program
only translates the points. In this case, before you use
ll2grid, you should divide those long lines into
smaller segments, by inserting points along the border with small intervals.
5.3 The final preparations
Before you can finally draw a map, you need to supply some files.
You need a configuration file. This file lists all the other files needed to
draw a map, and many options that determine the overall appearance of
the map. You will need to create this file yourself, using an editor
for plain text. See example and
manual.
You can have language islands that are marked in a different way on the
map. You will need to list those locations in a separate file, and define
this file in the configuration file with the option
othermarkers.
You need a file that has a numbered list of all locations
(
Label file), and a file with
location coordinates
(
Coordinate file).
You can use the
ll2dst program to
translate a file with coordinates into a table of geographic distances,
if the coordinates are in longitude and latitude.
5.3.1 Map setup
Finally, you need one to three files that contain fragments of PostScript code.
You can create these files using the
mapsetup program. The first file has
code that takes care of translating the map coordinates into image
coordinates. The second file determines the area that will be painted,
the outer border. The third file has code that draws lines on the map,
such as internal borders.
Below is an example of the use of mapsetup for the
map of Pennsylvania. The polygon of the outer border is in the file
PA.geo, and is accessed with the -c option.
There is no file with extra internal borders, so we'll use the same file,
just to draw the outer border, this time through the
-m option.
The -L option is used to tell the program that the
coordinates are in longitude and latitude. The program will take care
of a suitable adjustment between x-axis and y-axis.
mapsetup -L -c PA.geo -m PA.geo
When you run the command above, you'll get:
    transform saved to: out.trn
    clipping saved to: out.clp
    map saved to: out.map

    Don't forget to put the following line in your configuration file:

    aspect: 1.32501
Except for the mentioned aspect ratio, you also need
to enter the names of the files that were created into the
configuration file.
If you used ll2grid to convert the coordinates, then
you should not use the -L option,
and set the value of aspect to 1 in the configuration file.
If you don't have borders available, you still need to run
mapsetup to get at least one of the helper files. In
that case, you only use the file with location coordinates as input. For example:
mapsetup -L -l PA.coo
You will get this result:
    transform saved to: out.trn

    Don't forget to put the following line in your configuration file:

    aspect: 1.32261
5.4 Testing
Run a test to see if everything works fine. To do this, you don't need a
measurement, no clustering or MDS. Use the
mapmap program to get a plain map. For
example, with
map.cfg as the configuration file:
mapmap -o test.ps map.cfg
If all goes well, all that is left to do is adjusting the BoundingBox.
5.5 BoundingBox
To include a PostScript image into another document, the
BoundingBox must be correctly defined. The
BoundingBox is the smallest rectangle that fits the image. It is defined
with four integer numbers: the x and y coordinate of the left bottom
corner, and the x and y coordinate of the upper right corner (in this
order). You need to list those four numbers after the
boundingbox option in the configuration file. You can
determine the correct values with the help of GV (on Unix) or
GSview (on Windows).
5.5.1 GV
(description for GV version 3.5.8)
Open your first map in GV.
On top, on the menu bar, the paper size is visible, probably
BBox, A4 or Letter.
If it is set to BBox, then change it to one of the other
sizes, so you'll see all of the paper. Then move the mouse pointer over
the edges of the map, and look at the top left for the corresponding
coordinate values. Copy those coordinates into the configuration file,
make a new map, and open it in GV. This time,
choose the paper size BBox. If all is well,
the map should fit exactly in the visible paper area.
5.5.2 GSview
(description for GSview version 4.3)
Open your first map in GSview.
Open the menu
Options, the sub menu
Units, and select
pt. In the same sub menu
unselect the option
Fine Resolution.
Open the menu
Options and select
Show Bounding Box.
Open the menu
Options and unselect
EPS Clip.
There should now be a rectangle displayed on the image, that probably doesn't
fit. Move the mouse pointer over the edges of the map, and look at the
bottom for the corresponding coordinate values.
Copy those coordinates into the configuration file, make a new map, and open it in
GSview. If all is well, the rectangle should fit the
map exactly.